0. 예비 작업
1) Selenium 패키지 설치
pip install selenium

from selenium import webdriver
from selenium.webdriver.common.by import By
2) Chromdriver 설치
- 아래 경로로 이동해서 본인의 크롬 버전에 맞는 드라이버 chromedriver.exe를 설치해준다.
ChromeDriver - WebDriver for Chrome - Downloads
Current Releases If you are using Chrome version 115 or newer, please consult the Chrome for Testing availability dashboard. This page provides convenient JSON endpoints for specific ChromeDriver version downloading. For older versions of Chrome, please se
chromedriver.chromium.org
- 설치한 드라이버를 크롤링을 진행하는 py 파일이 존재하는 폴더에 저장해준다.
- Selenium으로 크롤링을 하는 과정은 사람이 직접 웹으로 접속해서 필요한 자료들을 긁어오는 과정을 자동화한다고 생각하면 된다.
- 코드를 짤 때도 만약 내가 직접 필요한 자료를 구해야 한다면 어떤 순서로 작업을 진행할까를 생각하면 된다. 단 컴퓨터가 나 대신 이 일을 진행해야 하므로 그 작업 순서를 꼼꼼하게 따져보아야 한다.
- 글로벌 기업 리뷰 사이트인 Great Place To Work에서 100 Best Companies to Work For의 기업 정보들을 긁어와보자.
Fortune 100 Best Companies to Work For® 2023
Looking for the top companies in the US? See what workplaces made the 2023 Fortune 100 Best Companies to Work For® list.
www.greatplacetowork.com
1. URL 접근
- 첫번째 순서는 해당 URL로 접근하는 것이다.
- URL로 접근하는 코드는 아래와 같다. 아래 코드를 로컬에서 입력하면 해당 URL 창이 뜰 것이다(Google Colab에서는 창이 뜨지 않는다).
driver = webdriver.Chrome()

url = "https://www.greatplacetowork.com/best-workplaces/100-best/2023"
driver.get(url)
2. HTML 코드 뜯어보기
- 크롤링에서 가장 시간을 오래 잡아먹는 작업이 이 html 코드를 뜯는 작업이다. 구하고자 하는 자료가 html 코드 상으로 어디에 위치해 있고, 여러 페이지에 걸쳐서 어떤 규칙을 갖는지 알아내야 한다.
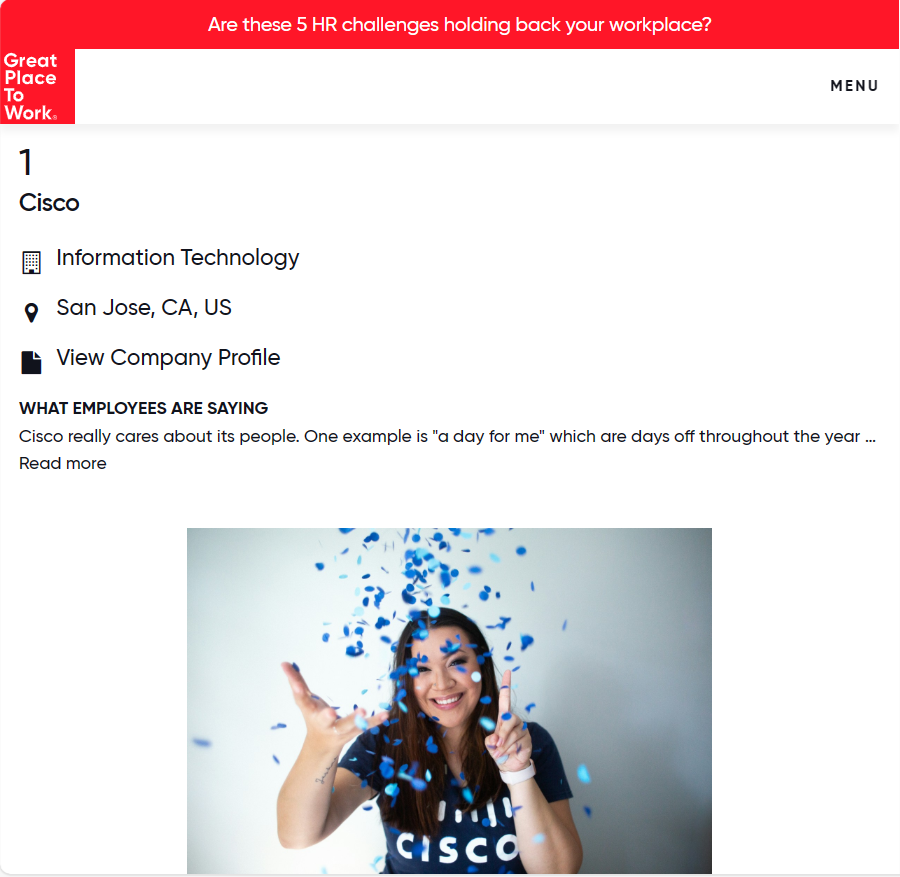
- 언급한 URL로 접근한다. 그러면 아래와 같은 화면이 나오는데, 이 중에서 그 기업의 순위, 이름, 소속된 산업, 위치를 구하고 싶다.
- 크롬 설정 - 도구 더보기 - 개발자도구로 들어가면 아래와 같은 탭이 우측에 뜬다. 여기서 우리는 우리가 찾고자 하는 정보가 어떤 코드로 나타나 있는지 찾아야 한다.
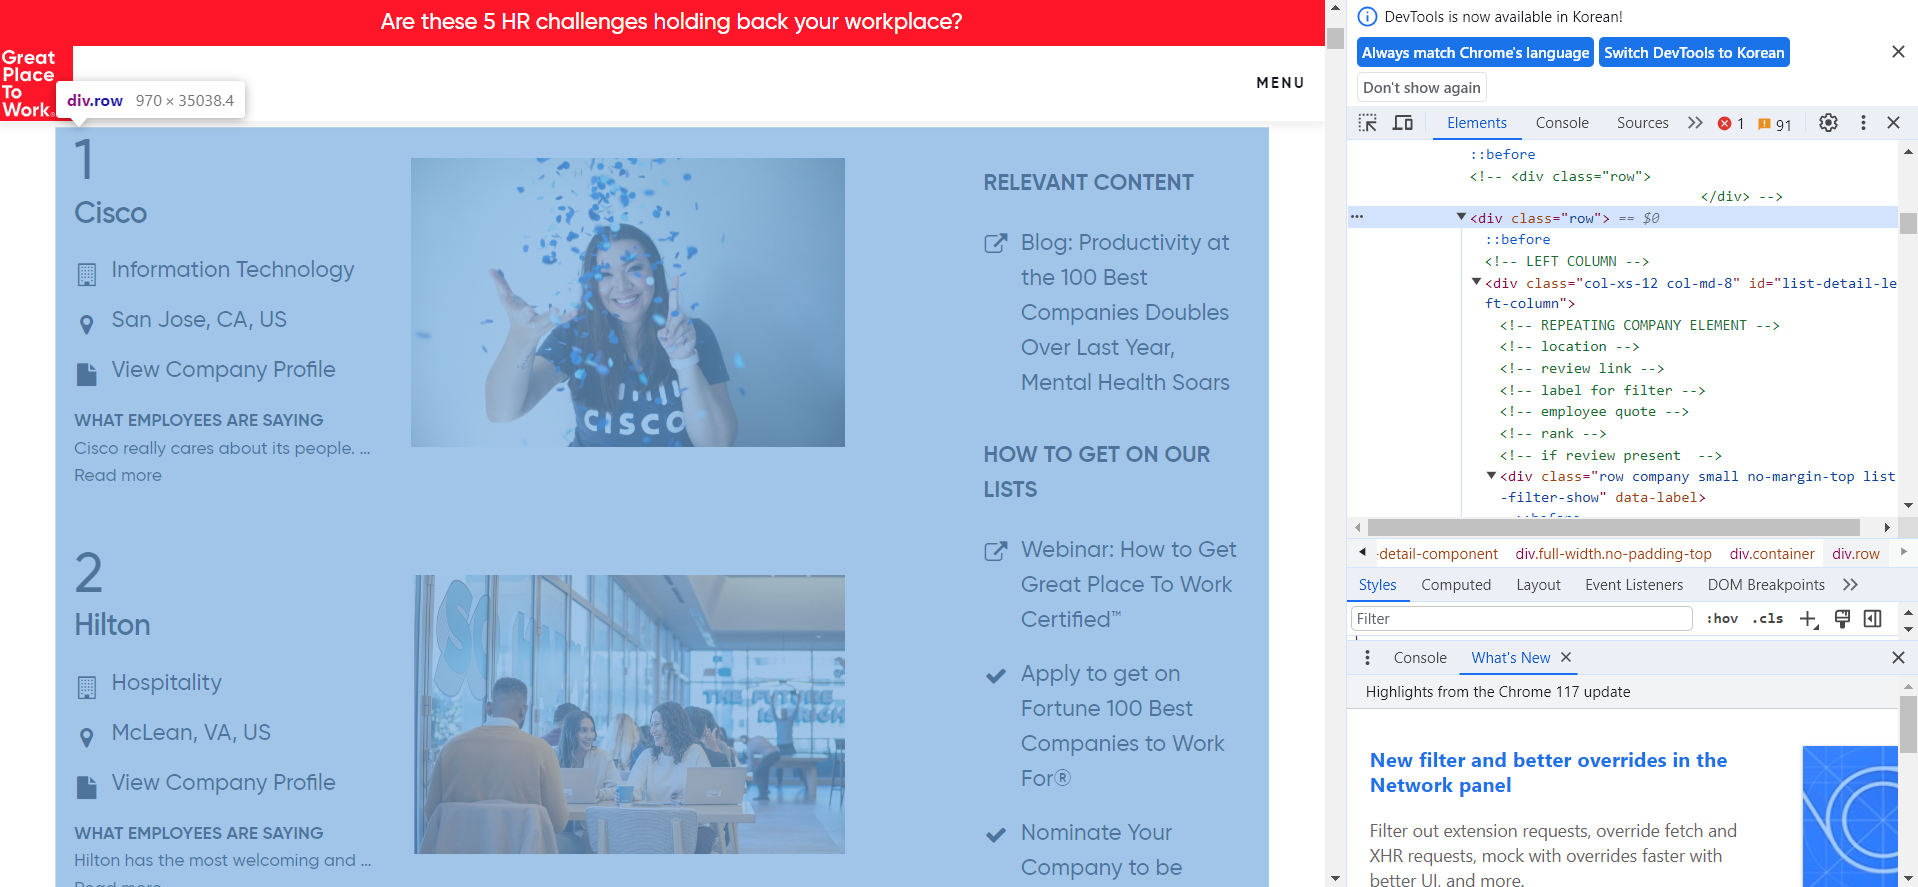
- <div class=='row'>에 마우스를 갖다대면 우리가 원하는 기업정보가 담긴 구역이 활성화된다. 이 부분의 정보로 접근하는 코드는 아래와 같다.
contents = driver.find_elements(By.CLASS_NAME, 'row')- contents를 그대로 print하지 말고, text 속성을 달아서 프린트해보면
content_list = [content.text for content in contents]- 대충 아래와 같은 리스트가 출력된다.

- 깨알같이 써있지만, 리스트의 5번째 원소만 보면
'1\nCisco\nInformation Technology\nSan Jose, CA, US\nView Company Profile\nWHAT EMPLOYEES ARE SAYING\nCisco really cares about its people. One example is "a day for me" which are days off throughout the year when Cisco shuts down to let employees recharge. We also have a company-wide shut down at the end of the year which allows the whole company time off to spend with family over the holidays. Cisco also cares about the environment, and social justice, and has a strong commitment to diversity and equality. Our ELT is very approachable and has addressed challenges head-on, they have shown strong leadership in addressing employee concerns around the many challenges we face in the world today. The culture here is really what makes Cisco a great place to work. It really is a family and people want the best for each other and the company.\nRead more'
- str 형태의 변수인데 "기업순위 \n 기업명 \n 산업 \n 위치 \n 기타 불필요한 정보"의 형식으로 구성돼있다. 이런 식으로 5번째 원소부터 104번째 원소까지, 총 100개의 기업들의 정보가 주어져있다.
3. 파싱
- 비교적 재밌는 단계는 파싱(Parsing)이다. 긁어온 정보를 우리가 이해하기 쉽게 가공/추출하는 작업을 말한다.
- 5번째 원소부터 우리가 원하는 기업 정보이므로 리스트를 인덱싱하여 필요한 정보들만 가져오자. 리스트의 원소들은 str 형태이고, 필요한 정보들이 '\n'을 기준으로 나눠져있으므로, '\n'을 구분자로 해서 str을 split하자. 기업순위, 기업명, 산업 등으로 분리된 요소들을 차곡차곡 정리해주면 파싱 작업이 완성된다.
content_list = content_list[5:105]

rank = []
firm = []
industry = []
location = []
for content in content_list:
    item = content.split('\n')
    rank.append(item[0])
    firm.append(item[1])
    industry.append(item[2])
location.append(item[3])- 마지막은 예쁘게 판다스 데이터프레임으로 만들어주면
df_1 = pd.DataFrame({'rank':rank, 'firm':firm, 'industry':industry, 'location':location})
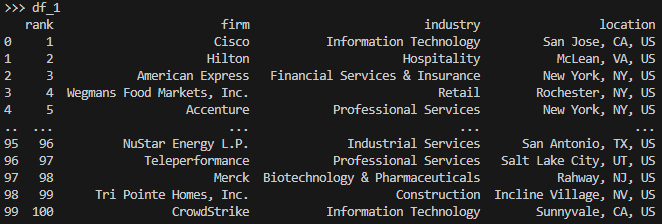
- 누구나 쉽게 이해할 수 있는 깔끔한 데이터프레임이 만들어졌다. csv 등으로 저장해서 원하는 분석에 사용하면 된다.
'유용한것 이것저것' 카테고리의 다른 글
| SQL - 프로그래머스 문제 몇 가지 기록 (0) | 2024.03.09 |
|---|---|
| Hugging Face 사용법 (2) Fine-tuning (2) | 2023.07.26 |
| Hugging Face 사용법 (1) pipeline 함수 사용하기 및 모델 객체 로컬에 다운 받기 (0) | 2023.07.25 |